Animated GIFs, nowadays - Are a sure shot way to capture eyeballs and deliver the message in the most entertaining way. It’s an image file that displays animated images and gives the impression as if the image is moving. Say, a hybrid between a still image and a video. And what makes it an excellent tool for marketing? The answer is that these are easy to consume, give users something that they will never forget and create a serious emotional impact. Now, this is actually a content that makes communication vibrant and thus, is worth experimenting with. Talk of icing on the cake, GIFs aren’t that difficult to create.
A Good Read - How Can Animation Actually Improve User Experience?
All you need is Photoshop and a few minutes and there you go! Yes, that is the quickest way to fire up your digital emotions. But in this internet-savvy period, there are several GIF-making tools too that can churn out the best, funniest and simplest results.
Here in this post, we will enlighten you with some ways of creating GIFs. Also, you will get to explore some GIF-making tools that will ease out the process and give you solutions for every mood and moment-
1. The Main Ingredient
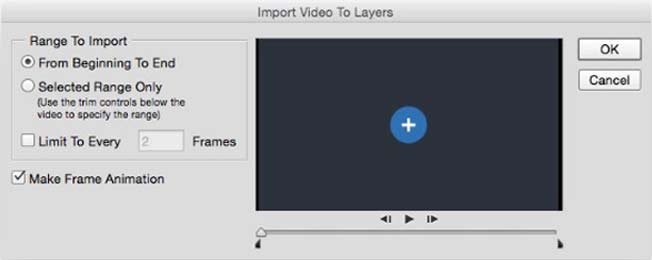
Okay, now this has become an open secret. Generally, all GIFs start as videos. Next, you can use ScreenFlow which is a good platform to maneuver videos. It is quite user-friendly and has some amazing animation tools to offer. After you export the animation as a video file, import the same into Photoshop, follow- File>Import>Video Frames As Layers in PhotoShop
2. The Image Art
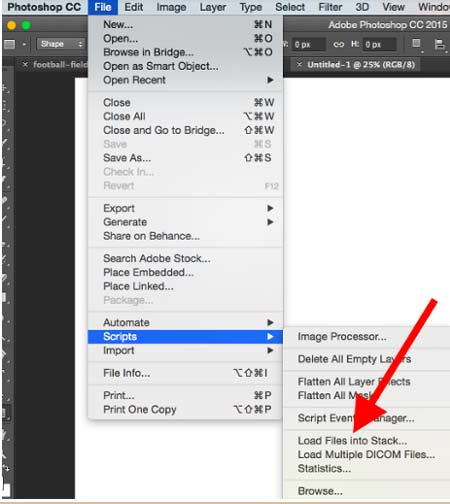
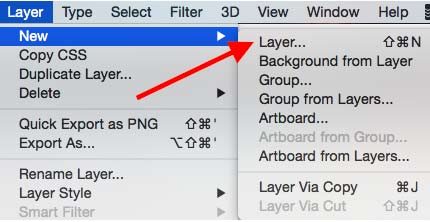
If you have images with you, gather them separately in a folder. Then go to Photoshop, follow File>Scripts>Load Files into Stack. Next, select the files you want in your GIF and click OK. Different layers for each image will be created. Make different frames of the animated GIF as you proceed with a new layer. For a new layer, follow Layer>New>Layer. Make sure that you name your layers; it can be done in the layer panel easily.
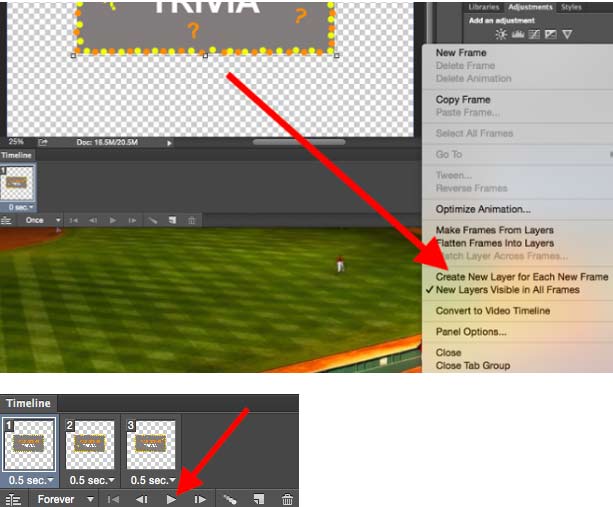
Moving on, you have to go to the Timeline window (in the Window menu) and there click on create frame animation. Remember this will be possible only if you have selected all your layers. Then, make each layer a frame of your GIF by selecting ‘Make Frames From Layers’ in the right menu. Select the time you want your frame to appear.
At last, decide how many times you want it to loop. Finally, you can preview your GIF by playing the play icon.
3. Less On Colours
If you want your GIFs to be awesome, select your colors wisely. It will not only affect your file size but also make your GIFs longer in duration and more interactive, still being small in file size.
4. Go For Motion Blur
Platforms like ScreenFlow and After Effects allows you to export your video with an additional feature of motion blur. This imparts a professional look to your animation and even gives a fudging look to things if you have to drop frames from your GIF in Photoshop just to adjust your file size.
5. Relax With Add-ons
It is quite tempting to add all sorts of frills to your GIF. Like adding little tooltips with usernames, a cursor pressing the plus button, hovering effects and showing more tooltips and hover states. Remember, you are not bound to show everything to make the picture attractive, so include only the stuff that is required. Don’t forget, your time and file size are limited.
6. Let’s Export
Before you start fretting about the points mentioned above, go ahead and export your GIF. If it is of a decent size, roll it! If not, here is something that you can do-
7. Drop Duplicates

We all know that an animation pauses or rests at some point. If you have a closer look, you will realize that these moments consist of a bunch of duplicate frames that last for nearly 0.03 seconds. If there are around 10 duplicates, remove 9 of them and adjust the duration of that one frame for a longer time, say 1 second. If this is of no use, go for re-importing your video and this time freezes the option- Limit to Every 2 Frames. This should do the deed and cut your file size considerably.
8. Easy On Colours
At the time of saving your GIF in Photoshop, you will come by a ‘colors’ drop-down option on your right. Experiment with it. Make it as low in number as possible without interfering with the creativity of your GIF.
9. Set Your Lossy
Now, that’s a weird word! But the thing that matters here is that if you adjust it somewhere on the scale 1 to 10, you will lighten some of the kilobytes without tampering with the quality.
Video Presentation
